Showing posts with label ADAPTER. Show all posts

Monday, 10 March 2014

Inserting repeating XML structures efficiently to the database with the DbAdapter


There are different methods for getting nested or repeating XML structures to the database. For example, loops on elements of an XML structure can be implemented in BPEL, calling the DbAdapter for every element. See for example http://javaoraclesoa.blogspot.nl/2012/03/loops-in-bpel-11-and-20.html. The method mentioned requires some work and one can question it's efficiency in terms of performance. For every item to be processed, the DbAdapter is called and a transformation is required. An alternative is using PL/SQL object types. PL/SQL object types can contain repeating and nested structures and can be send to the database in a single DbAdapter call. This reduces the overhead caused by calling the DbAdapter (faster) and the complexity of BPEL code (easier). Because no complex (technical) logic is required in the code calling the DbAdapter, this method also allows for easier implementation in for example Oracle BPM. In this post I'll describe how this method can be implemented using a BPEL code example. There are some considerations though when using PL/SQL object types


BPEL code

In BPEL the ADD_ITEMS procedure can be called. This procedure will bulk insert all received items in one action. From BPEL, the DbAdapter only has to be called once. This is a good thing considering calling the DbAdapter is relatively expensive. In BPEL only one simple transformation is required and no ForEach or While activities have to be used.

The below image shows a short overview of the process and simple exception 'handling'.


I've used the message type of the itemCollection (see also  http://javaoraclesoa.blogspot.nl/2012/03/loops-in-bpel-11-and-20.html). An itemCollection is as the name might suggest, an array of items. An item contains a name and a value. The below image shows the used transformation from the input message to the message used to call the DbAdapter. As can be seen, the repeating elements are present in the target message.


When calling the service from the webservice test page in the Enterprise Manager, it looks as followed;


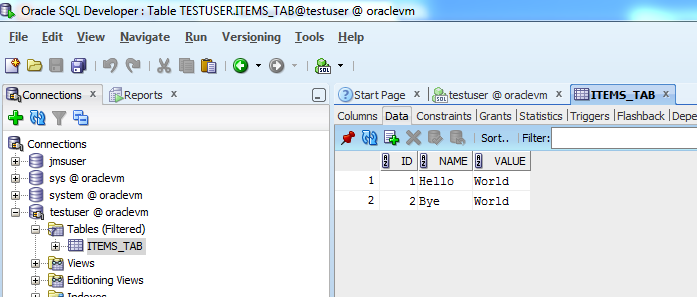
The result from this call is shown below;


TIP TO INCREASE DBADAPTER PERFORMANCE


In a few of our services in bpel and osb we’re inserting a lot of data (big payload messages) into the database by use of the jca db adapter.
We noticed performance would drop hugely when the db adapter needed to insert big payloads (CLOBS) and when the stream of messages on these services would continue even more performance would dramastically go down on the system.
After disabling “wrap data types” on the datasource in Weblogic we had a pretty good performance win on processing big clob messages into the database.
To disable wrapping of data type objects do the next :
  • Login the Weblogic Console
  • Click yourdomain > Services > Data Sources > your_datasource > Connection Pool > Advanced > disable Wrap Data Types


                                                                                                Happy Learning
                                                                                                DeepthiReddy :)

Friday, 20 December 2013

Configuring DataBase Adapter in OracleSoa 11g


This blog gives you a detailed approach to configure a DataSource, JNDI, DBAdapter, and its underlying technologies, facts and common issues.

Every single component used in a SOA Application has to be a service, and this applies to the database also. A database by itself cannot act as a service that can be exposed to the service.  Inorder to use the database in a SOA application, you need to expose it as a service in some way.

Oracle SOA Suite provides you this capability by using a JCA-build wrapper called the DBAdapter.

Using this adapter in your application is quite straight forward, provided it is configured correctly.
Many times, developers come across errors like

Please make sure that the JCA connection factory and any dependent connection factories have been configured with a sufficient limit for max connections. Please also make sure that the physical connection to the backend EIS is available and the backend  itself is accepting connections.
The invoked JCA adapter raised a resource exception.
Please examine the above error message carefully to determine a resolution.

at oracle.integration.platform.blocks.adapter.fw.jca.cci.EndpointInteractionException.getFabricInvocationException(EndpointInteractionException.java:75)
...

 while working with the DBAdapters. This is due to incorrect setup of the adapter.
Datasource setup is a one time step, and it is always good to know the underlying steps and technologies involved.

Before we go to the steps in configuring a DBAdapter, lets have a look at the various concepts involved in this.

DataSource
 A datasource, as its name implies, is anything that acts as a source for data. Database is a source of data, and it has to be configured as a datasource to the SOA infrastrucure.
Datasource in specific to the Weblogic Server is the connection to the actual underlying data provider.

Connection Pool
WebLogic communicates with the database through a connection pool. The connection pool enables WebLogic to use a fixed number of connections to databases rather than incur the   overhead of constantly creating and disposing of connections.

A data source has a connection pool attached to it, which it uses for connecting to the actual data provider(Database in this case). While creating a datasource, you give a JNDI name, which is  used by the JNDI infrastructure to call the datasource.

JNDI
JNDI, the Java Naming and Directory Interface is a standard interface for the Java based application clients to access the underlying naming and directory services.
This forms a wrapper over the underlying naming and directory services like DNS, LDAP, etc. and lets the client access different services in a standard way.

 
JNDI is independent of any specific naming or directory service implementations, and allows any service provider implementations to be plugged into the JNDI framework using the standard  Service Provider Interface(SPI).

There are basically 3 steps inorder to setup and configure a DBAdapter in a SOA Application.
  1. Configure a datasource for the underlying database, associate a JNDI name to it.
  2. Configure an outbound connection pool, and link it with the datasource using the same JNDI name.
  3. Use this JNDI name while configuring the DB Adapter.

Step 1 : Configure a Datasource for the underlying Database, associate a JNDI name to it
This step is done using the Weblogic Admin Console. Please make sure your database is up and running before this step.

Soa_domain --> Services --> Data Sources --> New --> Generic Data Source -->


Standard naming  convention for database sources would have a JNDI name prefixed with "jdbc/". You will use this name later to associate a connection pool to this datasource.
Select the appropriate driver


Give the underlying Database details, test the connection in the next screen(not shown here)


Select the server that is running the SOA infrastructure. This makes this datasource to run on that particular server, making this available to all the apps running on that server


Click on finish. After this, you should see this newly configured datasource in the Data Sources summary screen.

Now that the datasource is setup, and a JNDI name associated to it,
you need to create a connection pool for this datasource, in other words connections to this database.

Step 2 : Configure an outbound connection pool, link it to the datasource using the JNDI name
In Weblogic Admin Console,
soa_domain --> Deployments --> dbAdapter --> Configuration --> Outbound Connection Pools --> New


In the above screen, you are giving a new JNDI name, and this will be used in the SOA Suite's DBAdapter configuration wizard to obtain reference to this connection pool.
Now, you can see the newly configured JNDI name in the list of Outbound Connection Pools.
This new connection pool has to be linked to the datasource that you've created before.
There might be a bit confusion in the JNDI names. Here is how it is.
Both the datasource and Connection Pool has their specific JNDI Names

Datasource myDataSource has a JNDI Name
jdbc/myDataSource
Connection Pool has a JNDI Name
myConnPoolForDB, and this connection pool will use the name jdbc/myDataSource as its xaDataSourceName, and hence the linking to the datasource is done

After this setup, you need to redeploy the dbAdapter
Select the DBAdapter in deployments, Update-->Redeploy

Step 3 : Use this JNDI name while configuring the DB Adapter

While setting up the DBAdapter in the SOA Suite, in the configuration wizard, use the same JNDI Name
 
I Hope it is clear now what all goes into a dbAdapter setup.
My next post explains about working with a DatabaseAdapter in Oracle SOA Suite 11g


HappyLearning


                                                                                                            By DeepthiReddy

Sunday, 15 December 2013

Working with LIST FILE OPERATION in FileAdapter Oracle Soa 11g


 LIST FILE OPERATION

       List Files: List Files Operation lists file names in specified Locations.
     
           Create a SOA Project and provide project name as ListFiles


          As List files Operation is an outbound operation  , right click on external references select Insert-   >File Adapter.


    Provide Service Name as List Files and click on next


     Select interface as shown below and click on Next.


    Select Operation as ListFiles and click on Next.


    Browse for the folder where your files are present and click on Next.


      Provide the File Name with pattern Emp*.txt, means list all the files that are starting with Emp.


      Now, we have completed defining the file Adapter Service. Click on Finish.


    Create an XML Schema.


     Create a BPEL Process as shown below.


     Provide Name and select template as Synchronous BPEL Process, Browse for Input and Output XSD’s.


      Inside the Bpel Drag and drop Invoke activity as shown.


     Create Input and Output Variables for the Invoke activity by clicking on the “+” symbol.


     Take an Assign Activity In between Receive and Invoke and map the elements as shown.
       To trigger the service map the Input variable to invoke input variable.


     Drag and drop assign activity and place in between invoke and reply and map the elements as shown.
      Map  Size(Invoke Output variable) to no of files( Output variable).


    Now Deploy this Project. Give input as ListFiles to trigger this service.


     Below figure is the flow trace of the Listfiles project.
       Read folder has 2 files starting with Emp, we can see those 2 files with file directory, filename,


HappyLearning


                                                                                                                                   By DeepthiReddy

Working with Synchronuous Read in Oracle SOA 11g


Synchronous Read File Operation reads the current contents of a file.

     Create a new SOA Project


      Provide Project Name as SynchRead


     As Synchronous read file is an Outbound Operation, right click on external references select
     Insert->File Adapter as shown below.


    Then you will see welcome page of file adapter configuration wizard.


      Provide Service Name as SynchRead.


    Select Operation Type as Synchronous Read File and click on Next.


     Browse for the Directory in which your file is there to read, also browse for the archive folder and click         on Next.


    Provide the file name that you want to read and click on Next.


     Now, you need to build XML using Native formant Builder.


    Select as shown below.


     Browse for the file that you want to read as shown below.


      As the file contains only one record select 1st option  and click on next.


     Provide Target Namespace  and enter a name for element that will represent record as shown below.


    Specify Delimiters and click on next.


    Provide proper names for the elements as shown below.


    Test the schema as shown.


     We have completed generating native format.


    We have finished defining the File Adapter Service. Click On Finish.


    Create an XML Schema as shown below and click on OK.


     Provide filename, Target namespace, prefix as shown below.


    Create BPEL Process .


     Provide Name, and select template as synchronous BPEL Process,Browse for the Input and Output        XSD’s


     Inside the Bpel Drag and drop Invoke activity as shown below.


    Create Input and output variables by clicking on “+” symbol


     Drag & drop Assign activity as shown.


       For triggering this service just map the input variable to invoke input variable as shown.

<!--[endif]-->

     Drag and drop transform activity to map the elements from Invoke output variable to output variable.


      Map the elements as shown below.


    Now Deploy this Project,Give Input as SynchRead to trigger the service.


      Now we can see that the file has been read and the file will be deleted successfully from File Read folder        and will be placed in File Archive Folder.


HappyLearning

                     
                                                                                                          By DeepthiReddy