Tuesday, 27 October 2015

Howto: Setting Timeouts Correctly In Oracle SOA Suite 11g


Transaction timeout can be configured for BPEL in 11g using the below properties.
1. SyncMaxWaitTime
Maximum time BPEL process wait before returning result to client(or another Sync process)
To set this property
a. Login to EM console
b. Expand SOA and right click on “soa-infra”
c. From context menu, select SOA Administration –> BPEL properties
d. Click on “More BPEL Configuration properties…”
2.Transaction Time-out for BPEL EJB’s
The following EJB’s need to be configured for transaction time outs.
  • BPELActivityManagerBean
  • BPELDeliveryBean
  • BPELDispatcherBean
  • BPELEngineBean
  • BPELFinderBean
  • BPELInstanceManagerBean
  • BPELProcessManagerBean
  • BPELSensorValuesBean
  • BPELServerManagerBean
To change time out for these beans,
a. Login to Administration Console
b. Click on Deployments
c. Expand soa-infra –> EJB’s

d. Click on EJB for which you want to change the timeout
e. Click on Configuration
f. Change value for field “Transacion Timeout”
g. Click Save.
3. Global Transaction Timeout
This property is timeout in seconds for active transactions. After this time, if the transaction is still “Active”, then it gets rolled back.
To change this value
a. Login to Administration Console
b. Expand “Services” –> Click on “JTA”
c. Click on “JTA” tab if it’s on a different tab
d. Change value for field “Timeout Seconds”
Note: SyncMaxWaitTime < BPEL EJB's transaction timeout < Global Transaction Timeout
Set HTTP Post Timeout on the soa_server1/soa_server2 in all managed servers.
Finally, restart Weblogic server

Saturday, 10 October 2015

Oracle SOA 11g 11. 1.1.6 Performance Tuning of BPEL Processes


BPEL Properties Set Inside a Composite

This section lists the config properties of some sections of the deployment descriptor. For each configuration property parameter, a description is given, as well as the expected behavior of the engine when it is changed.
All the properties set in this section affect the behavior of the component containing the BPEL process only. Each BPEL process can be created as a component of a composite. These properties can be modified in composite.xml or in the System MBean Browser of Oracle Enterprise Manager Fusion Middleware Control. 
Some Concepts First
As a general practice, it is better to design your BPEL processes as transient instead of durable if performance is a concern. Note that this may not always be possible due to the nature of your process, but keep the following points in mind.

The dehydration store is uses to maintain long-running asynchronous BPEL instances storing state information as they wait for asynchronous callbacks. This ensures the reliability of these processes in the event of server or network loss.
 Oracle BPEL Process Manager supports two types of processes; transient and durable.

Transient Processes
Transient processes do not incur dehydration during their process execution. If an executing process experiences an unhandled fault or the server crashes, instances of a transient process do not leave a trace in the system. Thus, these instances cannot be saved in-flight regardless if they complete normally or abnormally. Transient processes are typically short-lived, request-response style processes. Synchronous processes are examples of transient processes.

Durable Processes
Durable processes incur one or more dehydration points in the database during execution. Dehydration is triggered by one of the following activities:
  • Receive activity
  • OnMessage branch in a pick activity
  • OnAlarm branch in a pick activity
  • Wait activity
  • Reply activity
  • checkPoint() within a <bpelx:exec> activity

 inMemoryOptimization

This property indicates to Oracle BPEL Server that this process is a transient process and dehydration of the instance is not required. When set to True, the completionPersistPolicy is used to determine persistence behavior. This property can only be set to True for transient processes or processes that do not contain any dehydration points such as receive, wait, onMessage and onAlarm activities. The inMemoryOptimization property is set at the BPEL component level. When set to False, dehydration is disabled which can improve performance in some use cases.
Values:
This property has the following values:
  • False (default): instances are persisted completely and recorded in the dehydration store database.
  • True: The completionPersist policy is used to determine persistence behavior. 


completionPersistPolicy

This property configures how the instance data is saved. It can only be set at the BPEL component level. The completionPersistPolicy property can only be used when inMemoryOptimization is set to be True (transient processes). Note that this parameter may affect database growth and throughput (due to reduced I/O).
ValueDescription
On (default)The completed instance is saved normally
DeferredThe completed instance is saved, but with a different thread and in another transaction.
FaultedOnly the faulted instances are saved.
Note: When an unhandled fault occurs, regardless of these flags, audit information of the instance is persisted within cube_instance table.
OffNo instances of this process are saved.
<component name="BPELProcess">
   <implementation.bpel src="BPELProcess.bpel" />

   <property name="bpel.config.completionPersistPolicy">faulted</property>
   <property name="bpel.config.inMemoryOptimization">true</property>
   ...
</component>

auditLevel

You can set the audit level for a BPEL process service component. This setting takes precedence over audit level settings at the SOA Infrastructure, service engine, and SOA composite application levels.
Set the bpel.config.auditLevel property to an appropriate value in the composite.xml file of your SOA project as shown in the example below:
<component name="BPELProcess">
<implementation.bpel src="BPELProcess.bpel" />
<property name="bpel.config.auditLevel">Off</property>
</component>
ValueDescription
InheritInherits the audit level from infrastructure level.
OffNo audit events (activity execution information) are persisted and no logging is performed; this can result in a slight performance boost for processing instances.
MinimalAll events are logged; however, no audit details (variable content) are logged.
ErrorLogs only serious problems that require immediate attention from the administrator and are not caused by a bug in the product. Using this level can help performance.
ProductionAll events are logged. The audit details for assign activities are not logged; the details for all other activities are logged.
DevelopmentAll events are logged; all audit details for all activities are logged.

Partner Link Property

You can dynamically configure a partner link at runtime in BPEL. This is useful for scenarios in which the target service that BPEL wants to invoke is not known until runtime. The following Partner Link properties can be tuned for performance:

idempotent

An idempotent activity is an activity that can be retried (for example, an assign activity or an invoke activity). Oracle BPEL Server saves the instance after a nonidempotent activity. This property is applicable to both durable and transient processes.
Values:
This property has the following values:
  • False: Activity is dehydrated immediately after execution and recorded in the dehydration store. When idempotent is set to False, it provides better failover protection, but may impact performance if the BPEL process accesses the dehydration store frequently.
  • True (default): If Oracle BPEL Server fails, it performs the activity again after restarting. This is because the server does not dehydrate immediately after the invoke and no record exists that the activity executed. Some examples of where this property can be set to True are: read-only services (for example, CreditRatingService) or local EJB/WSIF invocations that share the instance's transaction.

A BPEL invoke activity is by default an idempotent activity, meaning that the BPEL process does not dehydrate instances immediately after invoke activities. Therefore, if idempotent is set to true and Oracle BPEL Server fails right after an invoke activity executes, Oracle BPEL Server performs the invoke again after restarting. This is because no record exists that the invoke activity has executed. This property is applicable to both durable and transient processes.
If idempotent is set to false, the invoke activity is dehydrated immediately after execution and recorded in the dehydration store. If Oracle BPEL Server then fails and is restarted, the invoke activity is not repeated, because Oracle BPEL Process Manager sees that the invoke already executed.
When idempotent is set to false, it provides better failover protection, but at the cost of some performance, since the BPEL process accesses the dehydration store much more frequently. This setting can be configured for each partner link in the bpel.xml file.


nonBlockingInvoke

By default, Oracle BPEL Process Manager executes in a single thread by executing the branches sequentially instead of in parallel. When this property is set to True, the process manager creates a new thread to perform each branch's invoke activity in parallel. This property is applicable to both durable and transient processes.
Consider setting this property to True if you have invoke activities in multiple flow or flow n branches. This is especially effective if the parallel invoke activities are two-way, but some benefits can be realized for parallel one-way invokes as well.
Note:
Invocations to the same partner link will happen in sequence and not in parallel. If you invoke different partner links each time with nonBlockingInvoke set to True, then each link will work in parallel even if all of the partner links point to the same source.
Values:
  • True: Oracle BPEL Server spawns a new thread to execute the invocation.
  • False (default): Oracle BPEL Server executes the invoke activity in the single process thread.

validateXML

Enables message boundary validation. Note that additional validation can impact performance by consuming extra CPU and memory resources.
Values:
  • True: When set to True the engine validates the XML message against the XML schema during <receive> and <invoke> for this partner link. If the XML message is invalid thenbpelx:invalidVariables run time BPEL Fault is thrown. This overrides the domain level validateXML property.
  • False (default): Disables XML validation.


General Recommendations:
1. If your Synchronous process exceed, say 1000 instances per hour, then its better to set inMemoryOptimization to true and completionPersistPolicyto faulted, So that we can get better throughput, only faulted instances gets dehydrated in the database, its goes easy on the purge (purging historical instance data from database)
2. Do not include any settings to persist your process such as (Dehydrate, mid process receive, wait or Onmessage)
3. Have good logging on your BPEL Process, so that you can see log messages in the diagnostic log files for troubleshooting.
What should you do?
  • If the design of the process allows it, design your BPEL processes as short-lived, synchronous transactions.
  • If the design of the process allows it, avoid the activities listed above.
Any time your process is dehydrated to the dehydration store, this naturally impacts the performance of the process, and becomes a concern particularly in high volume environments.

Dehydration in SOA


Dehydration In SOA

Why Dehydration

  • Long running process or processes waiting for response consumes memory and CPU
  • While waiting for the response the bpel engine can store the process, thus freeing up server resources.
  • Over the life cycle of the BPEL instance, the instance with the current state of execution may be saved in database.


Dehydration

  • Storing the current status of the BPEL process(i.e. long running process, asynchronous process) into the database tables is known as dehydration
  • SOA_INFRA schema is the dehydration store which contains tables to hold the meta data of the process.
  • Synchronous Process
– Process gets dehydrated only at the end of the process.
– Using Dehydrate activity we can explicitly dehydrate process state if required.
  • Asynchronous Process
– Automatically dehydrated the process based on the activities used.
Dehydrate Activities

  • Few activities causes the BPEL instances to be dehydrated
  • If the process is dehydrated, then transaction ends and a new transaction is started once the bpel process resumes.
  • Dehydration activities:
Wait
Dehydrate(11g) / Checkpoint(10g)
Receive(without create instance)
Commit(Java embedded)
Pick
Invoke(nonBlocking property set on PL)
Non-idempotent activity(Invoke, receive) is encountered.
Types of BPEL Process

When and how dehydration occurs differ based on process types. Based on the dehydration we can categorize process in to 2 categories
  1. Transient Process: Oracle BPEL server dehydrates the process instance only at the end of the process. If server crashes in middle of the running process instance, the instances will not be visible in EM
  2. Durable Process: Oracle BPEL Server dehydrates the process instance in-flight at all midprocess breakpoint and non-idempotent activities, plus the end of the process. When the server crashes, this process instance appears in Oracle BPEL Control up to the last dehydration point (breakpoint activity) once the server restarts. If the server crashes before the process instance reaches the first midprocess breakpoint activity, the instance is not visible in Oracle BPEL Control after the server restarts.
When Dehydration Occur

  1. When the BPEL instance encounters a mid-process breakpoint activity (not including the initial receive).
Activities like wait, receive, pick, call to an async WSDL
That is where an existing BPEL instance must wait for an event, which can be either a timer expiration or message arrival. When the event occurs (the alarm expires or the message arrives), the instance is loaded from the dehydration store and execution is resumed. This type of dehydration occurs only in durable processes, which have mid-process breakpoint activities. A transient process does not have any mid process breakpoint activities.
  1. When the BPEL instance encounters a non-idempotent activity
When Oracle BPEL Server recovers after a crash, it retries the activities in the process instance. However, it should only retry the idempotent activities. Therefore, when Oracle BPEL Server encounters a non-idempotent activity, it dehydrates it. This enables Oracle BPEL Server to memorize that this activity was performed once and is not performed again when Oracle BPEL Server recovers from a crash.
Idempotent activities are those activities where the result is the same irrespective of no. of times you execute the process.
Repeated invocations have the same effect as one invocation.
E.g. Read only services, Receive activity
  1. When the BPEL instance finishes
At the end of the BPEL process, Oracle BPEL Server saves the process instance to the dehydration store, unless you explicitly configure it not to do so. This happens to both durable and transient processes.
Note: A BPEL invoke activity is by default (true) an idempotent activity, meaning that the BPEL process does not dehydrate instances immediately after invoke activities. Therefore, if idempotent is set to true and Oracle BPEL Server fails right after an invoke activity executes, Oracle BPEL Server performs the invoke again after restarting. This is because no record exists that the invoke activity has executed. This property is applicable to both durable and transient processes. If idempotent is set to false, the invoke activity is dehydrated immediately after execution and recorded in the dehydration store. If Oracle BPEL Server then fails and is restarted, the invoke activity is not repeated, because Oracle BPEL Process Manager sees that the invoke already executed.
Skipping dehydration

  • Skipping dehydration will increase performance with a cost of auditing.
  • By Default, all BPEL processes are dehydrated regardless of whether they are Synchronous or Asynchronous process.
  • For Synchronous processes that do not need to be durable, you can turn off the dehydration mechanism by setting the following properties at process or engine level:
    • Set inMemoryOptimization to true.
    • Set completionPersistPolicy property to faulted or Off.
  • Asynchronous process invocation messages are always saved to the dehydration store.
  • Durable process are always dehydrated regardless of the settings of the persistence properties.
Dehydration Tables

  1. Cube_Instance: Stores the information about the composite instance that gets created.
  2. Cube_scope: Stores information about the scopes and variables declared and used.
  3. DLV_Message: All the incoming payload details are stored.
  4. Invoke_Message: All the outgoing message payload details are stored.
  5. Audit_Trail: Used to store information of the xml that is rendered in EM console.

Monday, 20 July 2015

Oracle 12c Step by Step Installation

In this post, I will show you step by step installation of Oracle SOA 12c


Before starting the installation, make sure that you have a working Java Development Kit (JDK) environment.  At the moment Oracle Fusion Middleware products require JDK7.0 Update 55 or later.

Obtain the Product

Go to below link.
 
 
Accept the License Agreement.
  
  
Click on Download link to download the installer.
  
Find the fmw_12.1.3.0.0_soaqs_Disk1_1of1.zip, download it onto your system and extract it.
Soa suite download


You will see one jar file downloaded to your system. Extract that jar file and you will see below two executable jar files.
  •  fmw_12.1.3.0.0_soa_quickstart
  •  fmw_12.1.3.0.0_soa_quickstart2
You also need to download supported JDK, you will not be able to run Oracle SOA 12c installer if you don’t have supported JDK. You can download latest jdk from below link.

 http://www.oracle.com/technetwork/java/javase/downloads/index.html


Installing Oracle SOA Suite Quick Start Distribution

1. Lauch the quick start installer from a cmd window:
Go to java bin folder where you have installed latest JDK. E.g. C:\Program Files\Java\jdk1.8.0_05\bin Oracle SOA 12c is an executable jar file so we need to run it from command prompt. Run below command in command prompt. Java –jar Oracle_SOA_12c_exceutable_Jar_File_Location

Here you need to provide first executable jar file path.
java -jar fmw_12.1.3.0.0_soa_quickstart.jar

2. The installation wizard will launch and the installation welcome screen should appear.
Soa step1of6


3. Click Next.
Soa step2of6


4. Click on Browse and navigate to the folder where the SOA Suite Quick Start installation home should be placed.
5. Click Next.
Soa step3of6


6. Click Next.
Soa step4of6


Some time you may get below error when installer copy files to your system. This error occur when you use JDK 8 but you will not get this error when you use JDK 7.
 
 
7. Click Install to start the installation. This will only take a few minutes and after that successful installation should be confirmed with the following screen:
Soa step5of6


8. Click Next.
Soa step6of6


9. In this screen, you see installation summary. If you want to start the Jdeveloper then you can check the “Start Jdeveloper” box and click on Finish.


10. Leave the Start JDeveloper check box selected, so that the JDeveloper Integrated Development Environment is automatically started, and click Finish.
JDeveloper launches and after a few seconds, the Select Role screen should show up.

Jdev select role


11. Select the Studio Developer role and click OK.
 When prompted, say No to import preferences from a previous JDeveloper installation. The JDeveloper IDE with the Start Page should show up.

Jdev


12. Now we will add SOA extension to the JDeveloper. To do this go to Help --> Check for Updates.


Check all checkboxes and click on next.


Then you will see next window and in that window you see IDE folder and under that you see "Extension SDK".

Click on the checkbox and install it.


 13. To launch the integrated WebLogic Server, chose Run from the main menu and then select Start Server Instance from the drop-down menu.
Run menu


14. The first time you launch the server instance, you will be prompted to enter a password for your default domain. Enter welcome1 into the Password and Confirm Password field and leave the other fields on the default.
Create default domain


15. Click OK to launch the integrated server. This will take several minutes.
You can track the server’s launch in the Messages window pane. This window should automatically open at the bottom of the JDeveloper screen. If it is not there, you can open it by selecting Window from the top bar menu and Log from the drop-down menu.
When you see the following messages appear in the log, the Integrated WebLogic Server has launched successfully.
soa-console


The Oracle SOA Suite Development environment is now ready to use.


Sunday, 24 May 2015

Getting " table verify failed for table WL_LLR_ADMINSERVER " error while starting server

While creating a new domain, sometimes things get messed up in the SOAINFRA schema and you might get below exception :

javax.transaction.SystemException:
weblogic.transaction.loggingresource.LoggingResourceException:
java.sql.SQLException: JDBC LLR, table verify failed for table 'WL_LLR_ADMINSERVER', row
'JDBC LLR Domain//Server' record had unexpected value 'soa11g_domain//AdminServer' expected
'soa_new_domain//AdminServer'*** ONLY the original domain and server that creates an LLR table
may access it ***

This exception is a result of a reference of old domain name in WL_LLR_ADMINSERVER table .
Lets say you were having a domain named "soa11g_domain" and you created a new domain
named 'soa_new_domain. While starting the AdminServer of new domain, the WL_LLR_ADMINSERVER table is expected to have the soa_new_domain in its RECORDSTR column but it still has reference to your old domain.
To get around this, just login to DEV_SOAINFRA DB schema with your username/password and execute below query ( change the value for RECORDSTR according to your domain and server name ) and you will be good to go :

update WL_LLR_ADMINSERVER
set    RECORDSTR = 'soa_domain//AdminServer'
where  XIDSTR    = 'JDBC LLR Domain//Server';

commit;

Monday, 20 April 2015

How to remove contents from MDS repository


Oracle SOA 11G MDS used as a shared repository for managing and reusing shared resources like WSDL, XSD, DVM, XREF, FAULT-POLICIES and CONSTANTS across applications.
Here below are the WLST commands to import , export and delete contents from MDS

1. Execute wlst.cmd :


cd ${ORACLE_HOME}/oracle_common/common/bin

Execute wlst.sh file:
----------------------
wlst.cmd


2. Connect to WL Server :


connect('weblogic','welcome1','t3://localhost:7001')(if you have only adminserver)

connect('weblogic','welcome1','t3://localhost:8001') (if you have managed server)


3. Import Contents to MDS :


Import all files and folder :
-----------------------------
importMetadata(application='soa-infra',server='soa_server1',
               fromLocation='C:/Oracle/Middleware1/jdeveloper/integration/seed',docs='/apps/**')

Import files under specified directory to MDS:
----------------------------------------------
importMetadata(application='soa-infra',server='soa_server1',
           fromLocation='C:/Oracle/Middleware1/jdeveloper/integration/seed',docs='/apps/DVM/**')
importMetadata(application='soa-infra',server='soa_server1',
           fromLocation='C:/Oracle/Middleware1/jdeveloper/integration/seed',docs='/apps/XREF/**')

Import specific file to MDS:
---------------------------------
importMetadata(application='soa-infra',server='soa_server1',
               fromLocation='C:/Oracle/Middleware1/jdeveloper/integration/seed',
               docs='/apps/util/DVM/samplecountry.dvm')


4. Export Contents from MDS :


Export all files and folders from MDS:
--------------------------------------
exportMetadata(application='soa-infra', server='soa_server1',
               toLocation='C:/Oracle/Middleware1/jdeveloper/integration/seed', docs='/**')

Export all files and folders inside "/apps" folder :
----------------------------------------------------
exportMetadata(application='soa-infra', server='soa_server1',
              toLocation='C:/Oracle/Middleware1/jdeveloper/integration/seed', docs='/apps/**')

Export specific folder :
-----------------------
exportMetadata(application='soa-infra', server='soa_server1',
               toLocation='C:/Oracle/Middleware1/jdeveloper/integration/seed', 
               docs='/apps/util/fault-policies/**')
exportMetadata(application='soa-infra', server='soa_server1',
           toLocation='C:/Oracle/Middleware1/jdeveloper/integration/seed', docs='/apps/util/DVM/**')
exportMetadata(application='soa-infra', server='soa_server1',
           toLocation='C:/Oracle/Middleware1/jdeveloper/integration/seed', docs='/apps/util/XREF/**')

Export specific file:
---------------------
exportMetadata(application='soa-infra', server='soa_server1',
               toLocation='C:/Oracle/Middleware1/jdeveloper/integration/seed',
               docs='/apps/util/DVM/samplecountry.dvm')


5. Delete Contents from MDS :


Delete all files:
-----------------------------
deleteMetadata(application='soa-infra',server='soa_server1',docs='/apps/')

Delete files under specific folder:
-----------------------------------
deleteMetadata(application='soa-infra',server='soa_server1',
               docs='/apps/util/DVM')

Delete specific file:
---------------------
deleteMetadata(application='soa-infra',server='soa_server1',
               docs='/apps/util/DVM/samplecountry.dvm')


5. Delete Folder from MDS :


1. Go to ${ORACLE_HOME}/Oracle_SOA1/common/bin
2. Execute wlst.sh file.
3. wls:/offline>connect('weblogic','welcome1','t3://localhost:7011')
4. wls:/SOA-domain/serverConfig> sca_removeSharedData('http://localhost:8011',
                                    'DVM')
Example: sca_removeSharedData('http://<ManagerServerHost>:<ManagedServerPort>',
                              'DVM')

Just mention the any folder name inside root folder "/apps", that folder 
and files inside that folder will be deleted.


You can use asterisk(*) to specify more than one files e.g. to delete all files with names starting with Gen use 
deleteMetadata(application='soa-infra',server='soa_server1',docs='/apps/AIAMetaData/AIAComponents/ApplicationConnectorServiceLibrary/Gen*.wsdl')
Exception:
You may get the following exception
MDS-91002: MDS Application runtime MBean for "soa-infra" is not available. "deleteMetadata" operation failure.


Solution:
- Verify that your soa-infra is up and running and is on the correct server (Admin, soa_server1) as specified in the deleteMetadata() command 
- Verify that you've not fired the command to connect to other managed server during the steps to delete the file. If you connected firstly to SOA server, then to Admin Server and now you try to fire deleteMetadata(), it will give above error. Hence start again.


                                                                                                                                   By  
                                                                                                                    Deepthi reddy

Tuesday, 7 April 2015

DB based MDS and adf-config.xml

 DB based MDS and adf-config.xml


Version 11.1.1.6

JDeveloper can be used to connect to DB based MDS. The steps to create DB based MDS are -


  1. Create DB connection to DEV_MDS.
  2. Create MDS connection (DB based) while selecting the db connection created in first step.
  3. Add that MDS connection to the repository and you are ready to refer the artifacts from DB based MDS.


Sometimes if adf-config.xml is not correct you may face below error while opening the application.

Error: oracle.fabric.common.FabricException: oracle.mds.config.MDSConfigurationException: MDS-01330: unable to load MDS configuration document 

MDS-01329: unable to load element "persistence-config"
MDS-01370: MetadataStore configuration for metadata-store-usage "mstore-usage_2" is invalid. 
MDS-00011: unable to create configuration object or MDSInstance due to invalid configuration information: oracle.mds.exception.MDSException: MDS-01373: unable to retrieve password. 
MDS-01373: unable to retrieve password.


Make sure that mstore-usage is defined correctly. Pasting the correct adf-config.xml here -

<metadata-namespaces>
          <namespace path="/deployed-composites/default"
                     metadata-store-usage="mstore-usage_2"/>
          <namespace path="/soa/shared" metadata-store-usage="mstore-usage_3"/>
        </metadata-namespaces>
        <metadata-store-usages>
          <metadata-store-usage id="mstore-usage_2">
            <metadata-store class-name="oracle.mds.persistence.stores.db.DBMetadataStore">
              <property name="jdbc-userid" value="DEV_MDS"/>
              <property name="jdbc-password" value="password"/>
              <property name="jdbc-url"
                        value="jdbc:oracle:thin:@<ipaddress>:<port>:<SID>"/>
              <property name="partition-name" value="soa-infra"/>
            </metadata-store>
          </metadata-store-usage>
.....


modified above:

 <metadata-store-usages>
          <metadata-store-usage id="mstore-usage_1">
        <metadata-store class-name="oracle.mds.persistence.stores.db.DBMetadataStore">
              <property name="jdbc-userid" value="DEV_MDS"/>
              <property name="jdbc-password" value="system"/>
              <property name="jdbc-url"
                        value="jdbc:oracle:thin:@localhost:1521:XE"/>
              <property name="partition-name" value="soa-infra"/>
            </metadata-store>
          </metadata-store-usage>
        </metadata-store-usages>


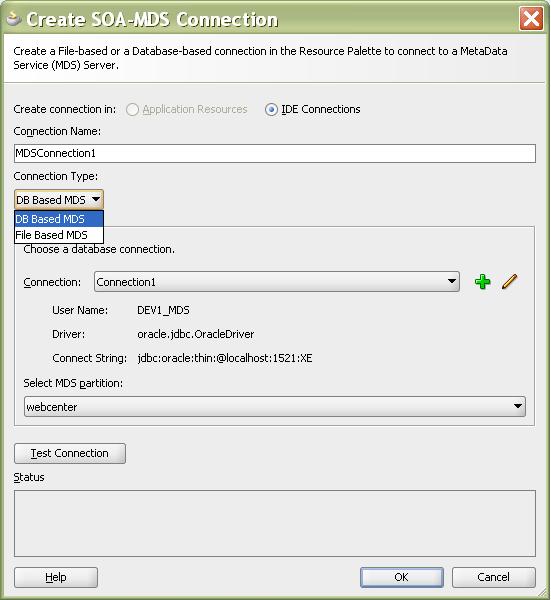
My DB based MDS connection looks like:


my Folder structure in MDS conncetion lokks like :


SOA 11g MDS - Share Common Artifacts

I am detailing the step-by-step instructions which allows for sharing of common artifacts (schema files/WSDLs) among SOA projects and more importantly helps in loose coupling of service bindings & remove service dependencies.

A typical use case is where the abstract WSDL definition of an external service can be stored in MDS and referenced from the SOA composite which will loosely couple the services and also guard against 'SOA Composite Invalidation' issues.

SOA 11g provides us with MDS repository (both file based & DB based) where common artifacts can be stored and referenced by all projects in the SOA infrastructure.

File based MDS is used during design/deploy time where as DB based MDS is used at run-time by the SOA infra. A configuration file named adf-config.xml that is part of every SOA project manages this partition mapping to be used by JDeveloper during design/deploy time.


All SOA projects that are deployed on the SOA infrastructure are stored in the MDS repository. If you create a connection from the JDeveloper 'Resource Palette' to the SOA MDS, there will be a 'deployed composites' folder which will contain all deployed artifacts.

MDS is created under <jdeveloper-home>/integration/seed directory. Default folder “soa” is used to store common system soa artifacts. All custom artifacts are supposed to be stored under a folder called “apps”, since this folder already exists in server.

Create directory structure under apps folder. In my case, I’ve created folder structure ../apps/cosdeaia/ApplicationConnectorServiceLibrary to store XML schema files. This ideally should match your schema structure.

1. First you go to your local 11g Jdeveloper installation folder. In my case it is C:\JDEV_HOME11.1.1.3\jdeveloper\integration\ folder (if you have already applied third party plugin patch provided by oracle then you will see seed folder by default with all previous configuration done). If not create a seed folder under integration folder.

2. Now create folder with name apps under seed (remember to create folder with name apps else you might face issue this oracle documents say i didn’t try out).

3. Under apps you can create your folder structure to place all your XSD, WSDL files.

4. We can create a SOA_MDS connection in Jdeveloper as below –

New Connections — > SOA-MDS Connection

5. The SOA-MDS connection can be created in two ways. One is File Based MDS and other is Data Based MDS.

MDS Setup

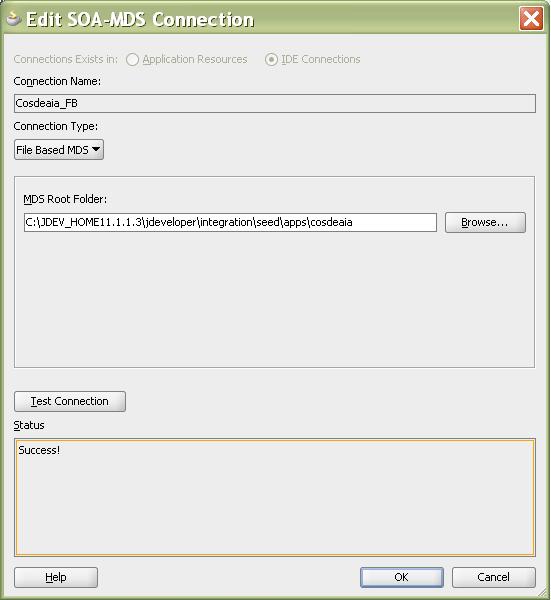
6. In Create SOA_MDS Connection window, select File Based MDS as Connection              Type for file based MDS connection, we will point to the local folder in our system               where all the WSDL and XSD files are placed as shown below. So when we use the wsdl         and xsd files in the  project, they will be referred from the local system.

MDS Setup

7. Click OK. Now the File Based MDS connection is created.


Connection Information for the MDS connection:
username: XXX_MDS (usually DEV_MDS) /SOA_MDS
password: xxxxxxxxx
MDS Partition: soa-infra
 

8. Lets see how to create DB based MDS connection. In Create SOA_MDS Connection window, select DB Based MDS as Connection Type for file based MDS connection.


 The file based MDS repository is generally the 'seed' partition under a typical JDeveloper install;

< JDev_Home>\integration\seed


Under this partition there is a root folder (soa) available by default which contains all the configuration files, schemas & WSDLs required by various different SOA components during design time. These files are also pre-deployed on the database MDS repository.

We are now free to create custom folders under the 'seed' partition to hold artifacts that are common references in a SOA environment. Generally, we create an 'apps' folder under the 'seed' partition which in turn holds various folders to hold various artifact types;
 Once the artifacts that needs to be shared/referenced are placed under the appropriate namespace (in this case 'apps'), we can let the SOA project in JDeveloper to point to MDS for these artifacts from a common location


 For DB Based MDS connection, we should have created all the schema for the weblogic in the database by running the Repository Creation Utility (RCU) wizard. After RCU execution, the DEV_MDS schema will get created in the database. We need to use the DEV_MDS schema connection and soa-infra as MDS Partition while creating the DB Based MDS connection as shown in the above screen shot.( Get in touch with your DBA for MDS schema credentials)

Click OK. Now the DB Based MDS connection is created.

Deploy MDS repository to Weblogic Server
First, we need to create JAR file bundle to include schemas,WSDL's  we need. Then we need to include this jar file into a SOA bundle that can be deployed to the SOA Server.

In JDeveloper Create Generic Application - MediatorMetaData


Create a project – MediatorLib

Right click on MediatorLib and select New –> Deployment Profile –> JAR File


Enter mediatorlib as the deployment profile name.


In the JAR deployment properties dialog, click on Contributors, click on Add button and select apps directory from your JDeveloper seed location – JDEV_HOME/integration/seed/apps  As for below screenshots


Click on OK. This completes creation of JAR file. We now need to create an application deployment profile to install these schemas in SOA Server.

Right click on MediatorMetaData application and select Deploy –> New Deployment Profile. Select “SOA Bundle” as Profile type.


Enter mediatorlib for Deployment Profile Name. From the properties dialog, open Dependencies and select mediatorlib.


To deploy MediatorLib to SOA Server, right click on MediatorMetaData and select Deploy –> mediatorlib.


Saturday, 28 March 2015

While opening em console for soa -- Error 404--Not Found


hi guys

usual error while settingup  weblogic domain :

while opeing the fm control using http://<hostname>.<domainname>:7001/em.

the below error message is displaying .

but i am able to open with http://<hostname>.<domainname>:7001/console.

*****************************************************************************************************************
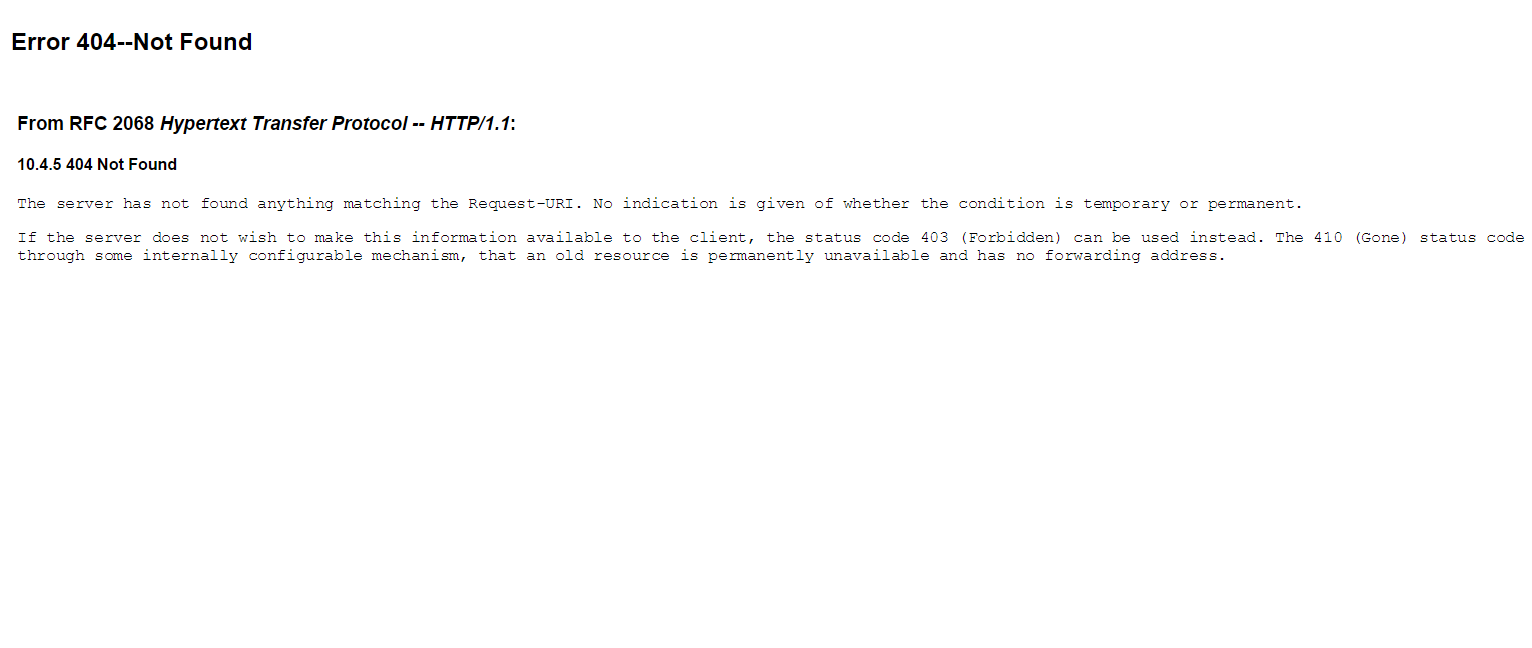
Error 404--Not Found
From RFC 2068 Hypertext Transfer Protocol -- HTTP/1.1:
10.4.5 404 Not Found

The server has not found anything matching the Request-URI. No indication is given of whether the condition is temporary or permanent.

If the server does not wish to make this information available to the client, the status code 403 (Forbidden) can be used instead. The 410 (Gone) status code SHOULD be used if the server knows, through some internally configurable mechanism, that an old resource is permanently unavailable and has no forwarding address.
**********************************************************************************************************************


Solution :  1) You may also like to check the status of application "em" in deployments section of your weblogic admin console. It must be in active state and targetted to admin server.
2) If not u find the EM option in deployements ,

I think you have not created your domain with Enterprise Manager template selected and hence no EM application is present. To extend your existing domain with EM, follow below steps-

1. Stop all servers of your existing domain.
2. Invoke the domain configuration wizard ($MW_Home\wlserver_10.3\common\bin\config.exe)
3. Choose "Extend an existing Weblogic domain" option. Click on next and select your existing domain. Then click on next.
4. Select "Oracle Enterprise Manager - 11.1.1.0[oracle_common]" template. Keep clicking on next and complete the wizard.
5. Start your servers.

Now you should be able to open the EM console.


before:


after :