Tuesday, 18 November 2014

Dehydration in BPEL - Oracle SOA Suite 11g


Dehydration - Offers Reliability, fail-over protection

Over the life cycle of a BPEL instance, the instance with its current state of execution may be saved in a database. When a BPEL instance is saved to a database, the instance is known as being dehydrated. The database where the BPEL instance is saved is called a dehydration store.

Once a BPEL instance is dehydrated, Oracle BPEL Server can off load it from the memory of Oracle BPEL Server. When a certain event occurs, such as the arrival of a message or the expiration of a timer, Oracle BPEL Server locates and loads the persistent BPEL instance from the dehydration store back into the memory of Oracle BPEL Server and resumes the execution of the process instance. Dehydrating BPEL instances offers reliability. If Oracle BPEL Server crashes in the middle of executing a process, the instance can be recovered automatically, programmatically, or manually from the dehydrated states. When Oracle BPEL Server resumes the execution of the process instance, it resumes from the last dehydration point, which is the last state of the instance that Oracle BPEL Server saves to the dehydration store.

                When and how the dehydration occurs differs based on the process types:

■ Transient process — Oracle BPEL Server dehydrates the process instance only once at the end of the process. When a host crashes in the middle of running the process instance, the instances are not visible from Oracle BPEL Control.
■ Durable process/idempotent — Oracle BPEL Server dehydrates the process instance in-flight at all midprocess breakpoint and non-idempotent activities, plus the end of the process. When the server crashes, this process instance appears in Oracle BPEL Control up to the last dehydration point (breakpoint activity) once the server restarts. If the server crashes before the process instance reaches the first midprocess breakpoint activity, the instance is not visible in Oracle BPEL Control after the server restarts.

        There are three cases in which dehydration occurs:

1. When the BPEL instance encounters a mid-process breakpoint activity (not including the initial receive)
Activities like wait, receive, onMessage, onAlarm, call to an async WSDL
That is where an existing BPEL instance must wait for an event, which can be either a timer expiration or message arrival. When the event occurs (the alarm expires or the message arrives), the instance is loaded from the dehydration store and execution is resumed. This type of dehydration occurs only in durable processes, which have mid-process breakpoint activities. A transient process does not have any midprocess breakpoint activities.

2. When the BPEL instance encounters a non-idempotent activity

When Oracle BPEL Server recovers after a crash, it retries the activities in the process instance. However, it should only retry the idempotent activities. Therefore, when Oracle BPEL Server encounters a nonidempotent activity, it dehydrates it. This enables Oracle BPEL Server to memorize that this activity was performed once and is not performed again when Oracle BPEL Server recovers from a crash.
Idempotent activities are those activities where the result is the same irrespective of no. of times you execute the process.
Repeated invocations have the same affect as one invocation.
Ex : Read-Only services

3. When the BPEL instance finishes

At the end of the BPEL process, Oracle BPEL Server saves the process instance to the dehydration store, unless you explicitly configure it not to do so. This happens to both durable and transient processes. For transient processes, the end of the process is the only point where the process instance is saved. This is because a transient process does not have any mid-process breakpoint activities and nonidempotent activities where the in-flight dehydration can occur.
------------------

Dehydration triggered by:

(a)Breakpoint activities: <receive>, <onMessage> (including <pick>), <onAlarm>, <wait>, and <reply>
(b)When using checkPoint()within a <bpelx:exec>activity

------------------

A BPEL invoke activity is by default an idempotent activity, meaning that the BPEL process does not dehydrate instances immediately after invoke activities. Therefore, if idempotent is set to true and Oracle BPEL Server fails right after an invoke activity executes, Oracle BPEL Server performs the invoke again after restarting. This is because no record exists that the invoke activity has executed. This property is applicable to both durable and transient processes.

If idempotent is set to false, the invoke activity is dehydrated immediately after execution and recorded in the dehydration store. If Oracle BPEL Server then fails and is restarted, the invoke activity is not repeated, because Oracle BPEL Process Manager sees that the invoke already executed.


--------------------

BPEL Dehydration Stores
As already explained, when a BPEL process instance is saved in the database, it uses the schema that is configured using Repository Creation Utility(RCU) that you would use during SOA environment setup.
Here are some of the tables that a BPEL engine uses to store its current instance state.

  • cube_instance - stores instance metadata, eg. instance creation date, current state, title, process identifier
  • cube_scope - stores the scope data for an instance
  • work_item - stores activities created by an instance
  •  document - stores large XML variables, etc
  • Invoke_Message: All the outgoing message payload details are stored.
  • Audit_Trail: Used to store information of the xml that is rendered in EM console.
  • DLV_Message: All the incoming payload details are stored.

Sunday, 2 November 2014

Configure Auto Recovery In Weblogic


Oracle SOA Suite 11g has some great features to recover faulted instances automatically. When a BPEL process flow errors out, it is retried with all its invocations. This is undesirable in some cases. For example if re-calling a composite results in duplicated data, data have been changed before the recovery is planned to be executed or you do not want to create too many composite instances in order to save the space in your SOAINFRA-schema. See below the different places where automatic recoveries are configured / disabled.
1) Change RecurringScheduleConfig (see also the screenshot below) 
  • Right-click soa-infra (SOA_cluster_name) 
  • Choose SOA Administration > BPEL Properties 
  • Click "More BPEL Configuration Properties" 
  • Click "Recovery Config" 
  • Change values for RecurringScheduleConfig 
    • maxMessageRaiseSize = 0 
    • startWindowTime = 00:00 
    • stopWindowTime = 00:00 
  • Click Apply 

2) Change StartupScheduleConfig (see also the screenshot below)
  • Right-click soa-infra (SOA_cluster_name)
  • Choose SOA Administration > BPEL Properties
  • Click "More BPEL Configuration Properties"
  • Click "Recovery Config"
  • Change values forStartupScheduleConfig
    • maxMessageRaiseSize = 0
    • startupRecoveryDuration = 0
    • subsequentTriggerDelay = 0
  • Click Apply


The properties startWindowTime and stopWindowTime specify the period during which Auto Recovery is active. By default auto recovery feature will be active from 12AM to 4AM everyday (remember that it’s SOA server time), shown in above screenshot. We can change these settings by simply updating the time values in 24 hr format and do click on Apply.
The property maxMessageRaiseSize specifies the number of messages to be sent in each recovery attempt, in effect resembles the batch size.
The property subsequentTriggerDelay specifies interval between consecutive auto recovery attempts and the value is 300 sec by default.
The property threshHoldTimeInMinutes is used by BPEL engine, to mark particular instance eligible for auto recovery once the recoverable fault occurs which is 10 min by default.
If we observe closely, none of these properties mention about number of recovery attempts to be made which is altogether a separate MBean property. To set, navigate to soa-infra -> SOA Administration -> BPEL Properties -> More BPEL Configuration Properties -> MaxRecoverAttempt. The default value is 2.

RecoveryAttempt
To disable ‘Auto Recovery’, set the maxMessageRaiseSize property value to 0. 


3) Change GlobalTxMaxRetry
The property GlobalTxMaxRetry specifies how many retries are performed if an error is identified as a retriable one. For example, after several web service invocations, if dehydration fails due to a data source error, then this is identified as a retriable error and all activities from the prior dehydration state are retried. If the activities being retried are not idempotent (that is, their state can change with each retry and is not guaranteed to give the same behavior), then multiple retries can be problematic.

You can set GlobalTxMaxRetry to 0 in the Systems MBean Browser.
  • Right-click soa-infra (SOA_cluster_name)
  • Choose SOA Administration > Common Properties
  • Click "More SOA Infra Advanced Configuration Properties"
  • Click "GlobalTxMaxRetry"
  • In the Value field, enter an appropriate value
  • Click Apply

BPEL Recovery Console:
Navigate to soa-infra -> Service Engines -> BPEL -> Recovery to view the recoverable instances. Note that, the console shows all recoverable instances irrespective of enabled/disabled ‘Auto Recovery’. We can manually recover the  faulted instances from this console when Auto recovery is not enabled.


recoveryconsole

Auto Recovery Behavior:
Whenever a recoverable fault (this term is more abstract, I verified this behavior with Remote, Binding and User Defined Faults) occurs during the BPEL processing, it will be visible in Recovery console. If Auto Recovery is enabled, after threshHoldTimeInMinutes BPEL runtime will try to auto recover the instance. If it’s not successful, again number of recovery attempts will be made as given for MaxRecoverAttempt with an interval as given for subsequentTriggerDelay. If instance fails even after these maximum recover attempts, the instance will be marked as exhausted (can be queried on recovery console using message state as exhausted). We can use ‘Reset’ button to make these instances eligible for Auto Recovery again.
Note that, we observe this behavior only when the fault is thrown back to BPEL runtime or fault is not caught within BPEL process.


Configuring Weblogic App Server in Eclipse


We are going to explore how we can add Weblogic Application Server in Eclispe IDE. We are using:


Ok. Let's Start. 
  • Start up your Eclipse IDE and switch to J2EE Perspective:


  • By the bottom of the screen you will find the "Servers" tab. Click it.


  • Right click in the blank space within the tab and choose new->server.


  • In the dialog that pops up, expand the Oracle server type and choose Oracle Weblogic Server 11gR1 PatchSet 4. Hit Next. 
    (Note:- We choose 11gR1 PatchSet 4 as the server adapter because we have this particular server installed. If your server is different, you need to choose the different version of the adapter here.)

  • Chances are that when you hit next, the wizard looks for and finds the actual server in your system and populates it it the appropriate boxes. However if it does not, choose the browse button next the the field "Weblogic home" and choose your server.
  • For java home, choose either jrockit, which comes with Weblogic and is tuned for production environments or you may choose any other JVM.


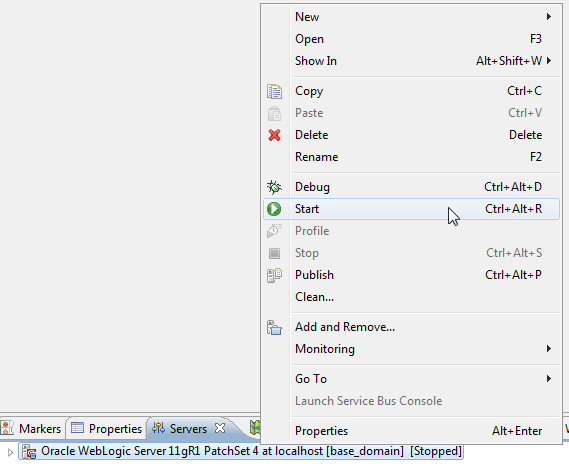
  • Click next and finish in the subsequent screens and you are done with the configuration. To test it, you can right click on the newly added server and hit Start


Creating Sample Webservice In webLogic Using Eclipse IDE


This post explains developing standalone webservice in Weblogic
We will be using Weblogic Application Server and Eclipse to develop a very simple Web Service. 
This tutorial serves two purposes:
  1. Clarifies some basic ideas about creating a web service.
  2. You can use it to create provider services for our OSB, ESB, BPEL examples.


Start your Weblogic server. You need to click this:


  • Now start your Eclipse IDE. In my system, I have one shortcut in desktop.
  • Select File -> New -> Other


  • Select Web -> Dynamic Web Project


  • Give a suitable Project name and Choose to put it into an EAR project(optional).


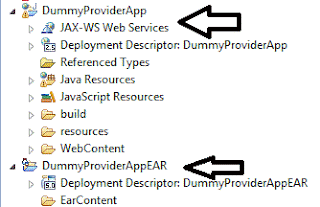
  • Keep clicking next and finish. If all goes well, you will end up having a Web Project and an Enterprise Application in your workspace:


  • Right click on your dummy web project and click New-> Folder. Name it, say, resources. We will use it to keep our web service artifacts like xsd and wsdl.
  • Right click on your "resources" folder and select New->Other. Then in the dialog, select XML -> XML Schema. Click Next, give a suitable file name and hit Finish. You will have your XSD file opened in the default editor. Use this step twice to create two files, say, provider_req.xsd and provider_resp.xsd.
  • Here is how your request xsd will look like:


  • And here is how our response xsd will look like:


  • Again right click on your resources folder and do a New -> Other to open the dialog. Here choose Web Services -> WSDL and click Next. Give it a name, say, shipmentOrderSrvc.wsdl and click next. In the following screen, choose as shown in the following img. Remember to change the namespace.


  • You will have the wsdl file opened in your workspace. The file is big so the following screenshots split the whole wsdl in several parts:
  • Namespace declarations:


  • The types section of the wsdl:


  • The abstract part of the wsdl:


  • The concrete part of the wsdl:


  • The whole wsdl(sections shrinked):


  • To learn more about xsd and wsdl, please visit w3schools.com .
  • At this point you need to start your server, either from within Eclipse or separately from outside. If you wish to start your server from eclipse, you need to configure it first. These steps can help  http://simplifiedsoa.blogspot.com/2011/12/baby-steps-adding-weblogic-app-server.html :
  • Once you have started the server, you need to create the Java stubs and other classes for your service. No worries, you can do this with right and left clicks only. 
  • Right click on the wsdl you just created. Then select New -> Other and from the dialog, choose Web services -> Web service. Clicking next will start the wizard.


  • In the New Web Serivce wizard, everything is straight forward:


(Note:- For both of the app server and web service runtime, you can choose different values, here we choose Weblogic + Axis as we are using Weblogic Server and Apache Axis comes a web service runtime with it.


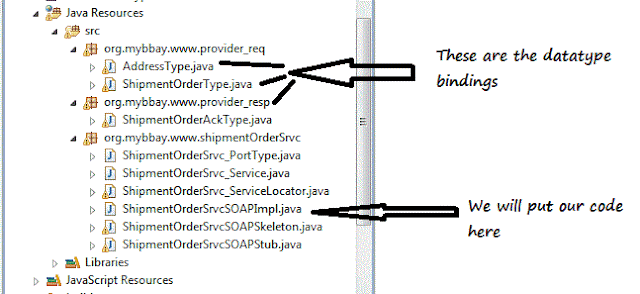
  • Now hit finish. It will take some time before you have a big number of packages and classes created in your workspace, something like this:


  • Its a good idea to browse through the set of classes and observe how they are formed. Notice the package names; they are almost opposite to what your namespace was, right?
  • In your workspace, you will also find other new artifacts like these:


  • Before your start coding for your web service, and there is not much left for that :), you should have a look at each of these artifacts. They are pretty much self explanatory and will help you better understand the working of the system.
  • Ok. Straight to coding. Open up the file named ShipmentOrderSrvcSOAPImpl


  • So now that we have our code ready, lets not wait anymore. Startup your server and run your application.
  • Remember, you need to be in the J2EE perspective to find the "Servers" tab the bottom of the page. You will find the configured Weblogic server here. Right click and click start.


  • After the server starts, deploy your application. Right click on your application -> Run as -> Run on server:


  • You will see the dialog that will let you choose the app server. Choose it and hit finish.
  • It will take some time before your application gets deployed.
  • After deployment, open the generated wsdl file, i.e., this one:


  • After you open this file, scroll down to the bottom of it and you will find the endpoint, i.e., where your service can be found on the network. Copy it:


  • Open SoapUI. (This is a software you need to use to test your services. Its free and you can get it at soapui.com.)
  • Right click on projects and click new Project.


  • In the dialog that pops up, Enter the endpoint followed by ?wsdl in the Initial WSDL field. Hit Ok.


  • In the left panel, you will find something like this:


  • Double click Request1. It will bring up the SOAP request:


  • You need to put some dummy values in the above step.
  • Now hit the green arrow on the top left. Soon after that you will see the response in the adjoining right window: