Showing posts with label OSB. Show all posts

Sunday, 2 November 2014

Configuring Weblogic App Server in Eclipse


We are going to explore how we can add Weblogic Application Server in Eclispe IDE. We are using:


Ok. Let's Start. 
  • Start up your Eclipse IDE and switch to J2EE Perspective:


  • By the bottom of the screen you will find the "Servers" tab. Click it.


  • Right click in the blank space within the tab and choose new->server.


  • In the dialog that pops up, expand the Oracle server type and choose Oracle Weblogic Server 11gR1 PatchSet 4. Hit Next. 
    (Note:- We choose 11gR1 PatchSet 4 as the server adapter because we have this particular server installed. If your server is different, you need to choose the different version of the adapter here.)

  • Chances are that when you hit next, the wizard looks for and finds the actual server in your system and populates it it the appropriate boxes. However if it does not, choose the browse button next the the field "Weblogic home" and choose your server.
  • For java home, choose either jrockit, which comes with Weblogic and is tuned for production environments or you may choose any other JVM.


  • Click next and finish in the subsequent screens and you are done with the configuration. To test it, you can right click on the newly added server and hit Start. 


Creating Sample Webservice In webLogic Using Eclipse IDE


This post explains developing standalone webservice in Weblogic
We will be using Weblogic Application Server and Eclipse to develop a very simple Web Service. 
This tutorial serves two purposes:
  1. Clarifies some basic ideas about creating a web service.
  2. You can use it to create provider services for our OSB, ESB, BPEL examples.


Start your Weblogic server. You need to click this:


  • Now start your Eclipse IDE. In my system, I have one shortcut in desktop.
  • Select File -> New -> Other


  • Select Web -> Dynamic Web Project


  • Give a suitable Project name and Choose to put it into an EAR project(optional).


  • Keep clicking next and finish. If all goes well, you will end up having a Web Project and an Enterprise Application in your workspace:


  • Right click on your dummy web project and click New-> Folder. Name it, say, resources. We will use it to keep our web service artifacts like xsd and wsdl.
  • Right click on your "resources" folder and select New->Other. Then in the dialog, select XML -> XML Schema. Click Next, give a suitable file name and hit Finish. You will have your XSD file opened in the default editor. Use this step twice to create two files, say, provider_req.xsd and provider_resp.xsd.
  • Here is how your request xsd will look like:


  • And here is how our response xsd will look like:


  • Again right click on your resources folder and do a New -> Other to open the dialog. Here choose Web Services -> WSDL and click Next. Give it a name, say, shipmentOrderSrvc.wsdl and click next. In the following screen, choose as shown in the following img. Remember to change the namespace.


  • You will have the wsdl file opened in your workspace. The file is big so the following screenshots split the whole wsdl in several parts:
  • Namespace declarations:


  • The types section of the wsdl:


  • The abstract part of the wsdl:


  • The concrete part of the wsdl:


  • The whole wsdl(sections shrinked):


  • To learn more about xsd and wsdl, please visit w3schools.com .
  • At this point you need to start your server, either from within Eclipse or separately from outside. If you wish to start your server from eclipse, you need to configure it first. These steps can help  http://simplifiedsoa.blogspot.com/2011/12/baby-steps-adding-weblogic-app-server.html :
  • Once you have started the server, you need to create the Java stubs and other classes for your service. No worries, you can do this with right and left clicks only. 
  • Right click on the wsdl you just created. Then select New -> Other and from the dialog, choose Web services -> Web service. Clicking next will start the wizard.


  • In the New Web Serivce wizard, everything is straight forward:


(Note:- For both of the app server and web service runtime, you can choose different values, here we choose Weblogic + Axis as we are using Weblogic Server and Apache Axis comes a web service runtime with it.


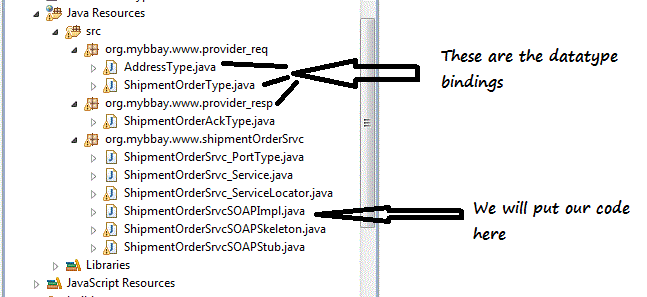
  • Now hit finish. It will take some time before you have a big number of packages and classes created in your workspace, something like this:


  • Its a good idea to browse through the set of classes and observe how they are formed. Notice the package names; they are almost opposite to what your namespace was, right?
  • In your workspace, you will also find other new artifacts like these:


  • Before your start coding for your web service, and there is not much left for that :), you should have a look at each of these artifacts. They are pretty much self explanatory and will help you better understand the working of the system.
  • Ok. Straight to coding. Open up the file named ShipmentOrderSrvcSOAPImpl


  • So now that we have our code ready, lets not wait anymore. Startup your server and run your application.
  • Remember, you need to be in the J2EE perspective to find the "Servers" tab the bottom of the page. You will find the configured Weblogic server here. Right click and click start.


  • After the server starts, deploy your application. Right click on your application -> Run as -> Run on server:


  • You will see the dialog that will let you choose the app server. Choose it and hit finish.
  • It will take some time before your application gets deployed.
  • After deployment, open the generated wsdl file, i.e., this one:


  • After you open this file, scroll down to the bottom of it and you will find the endpoint, i.e., where your service can be found on the network. Copy it:


  • Open SoapUI. (This is a software you need to use to test your services. Its free and you can get it at soapui.com.)
  • Right click on projects and click new Project.


  • In the dialog that pops up, Enter the endpoint followed by ?wsdl in the Initial WSDL field. Hit Ok.


  • In the left panel, you will find something like this:


  • Double click Request1. It will bring up the SOAP request:


  • You need to put some dummy values in the above step.
  • Now hit the green arrow on the top left. Soon after that you will see the response in the adjoining right window:


Wednesday, 11 December 2013

Writing File Through OSB File Protocal

Hi Guys.

In this post I will explain you how to write file  in OSB.

Follow below step to write file in OSB.


Step 1.) Create new OSB project and Business Service.

  • First Create a session and then click on "Project Explorer".
Create New project
  • Add new project with the name "WriteFile".
Write File Project
  • Now click on newly created project to add new folder.
Add Folder
  • Add new folder inside "WriteFile" project with name "businessService".
business Service Folder
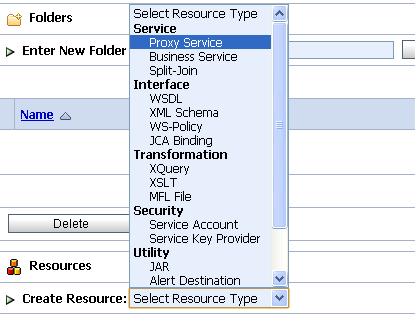
  • Now click on "businessService" folder to create business service and choose "Business Service" as "Resource Type".
Choose Resource Type

Step 2.) Fill details in Business Service.
  • Enter Business service name and choose "Service Type" as "Messaging Service". Click on "Next" button.
Name Business Service
  • Choose "Request Message Type"  based on what type of file you want to write.In my case it is text file so I will choose "Text". Choose "Response Message Type" as "None" as we don't need any response after writing the file.
Choose Message Type

  • Choose "file" protocol from drop down list.
file Protocol
  • Provide the "Endpoint URI" and click on "Add" button.
              file:///{Dirve Id}/filedir/

EndpointURI
  • Provide File Transport Protocol details. Click "Next".
Fill File Name

Accept all default values and save Business Service. Now your Business Service is ready to write text file. 


HappyLearning

                                                                                                                      By DeepthiReddy


Reading File Through OSB File Protocal

Hi Guys


Lets Understand how we can read file through OSB. This post explains how you can read file in OSB.

Follow below steps to read file in Oracle Service Bus.


Step 1.) Create new OSB project and Proxy Service.

  • First of all create Session by clicking on "Create" Button and then click on "Project Explorer" to create new project.
Create Session
  • Enter the name of the project "ReadFile" and add it.
Create New Project
  • Now click on newly created project "ReadFile" to add new folders.
Read File Project
  • Add "proxyService" folders which contains proxy service that will poll/read the file from given location.

Proxy Service
  • Now click on newly created "proxyService" folder to create proxy service and choose "Proxy Service" as Resource Type.
Service Resource Type

Step 2.) Fill details in Proxy Service to read/poll file.
  • Enter proxy service name and choose "Service Type" as "Messaging Service". Click on "Next" button.


Proxy Service name and type


  • Choose "Request Message Type" based on what type of file you want to read/poll. In my case its text file so I will choose "Text". Choose "Response Message Type" as "None" because we don't need any response after reading the file. Click on "Next" button.
Request Message Type
  • Choose "file" protocol from drop down list.
file protocol
  • Provide the "Endpoint URI". Click on "Next" button.
                   file:///{Drive Id}/filedir/


file directory
  • Next step is to provide File Transport Protocol details. 
    • File Mask: Default value is *.* that means you can send any type of file to the service. I created "test.txt" file in C:/read directory for this post.
    • Polling Interval: It specifies the number of seconds between each polling event. Leave it as default.
    • Read Limit: It specifies the maximum number of files to process during each polling event.Default value is 10. If you set it to 0 that means all files that match the file mask at the time of polling event will be processed. Leave it as default.
    • Sort By Arrival : It forces the selection of files while polling based on their creation date. Remain it unchecked.
    • Scan SubDirectories: It says OSB proxy look for files recursively in any existing subdirectories. Leave it unchecked.
    • Pass By Reference : It tells copy the file to archive directory and pass a reference to the file in the message itself. Leave it unchecked.
    • Post Read Action: It tells we can either delete the file or archive the file after the message has been processed. Choose "delete" for this sample.
    • Stage Directory : It specifies where the files should be stored while they are being processed. So while polling, OSB first move file from polling directory to stage directory and process file from there.
    • Archive Directory : Directory where we want to archive the file. This will not be available if you choose "delete" as Post Read Action.
    • Error Directory: Directory where file will be sent of there is any problem or issue. 
File Transport Protocol Properties
  • Accept default values and you are done with your proxy service. 
  • Activate the session and to test proxy service put test.txt file in C:/read directory.

refer site : http://www.oracle.com/technetwork/articles/soa/schmutz-osb-cookbook-1543518.html


HappyLearning


                                                                                                                            By DeepthiReddy